Three more pages have been finished in the gallery, they are: Fashion (which reminded me how much I hate moodboards- almost as much as I hate Fridays, though back then it was probably even worse because I was actively having to work on them and Fridays may have even been a relief), Other/Uncategorised (which kind of draws attention to the fact that I was experiencing some sort of existential crisis between the years of ’02-’05), and Winged Dogs (featuring my oldest and least consistent characters).
This leaves us with just one unfinished page to go! I am hoping to have it all done and uploaded early next week.
After that? It will finally be time to make some progress on this pile of textiles that’s been studiously ignored all year! And maybe get Separation Anxiety to a point where it’ll actually be ready for release in July. Though it may be postponed if I don’t get on top of everything else by then. Like sorting out delayed loading in the gallery because some of those pages like taking their sweet fucking time what with my image-heavy ways and all.
Speaking of ignoring piles of textiles, I actually did manage to finish a costume recently:
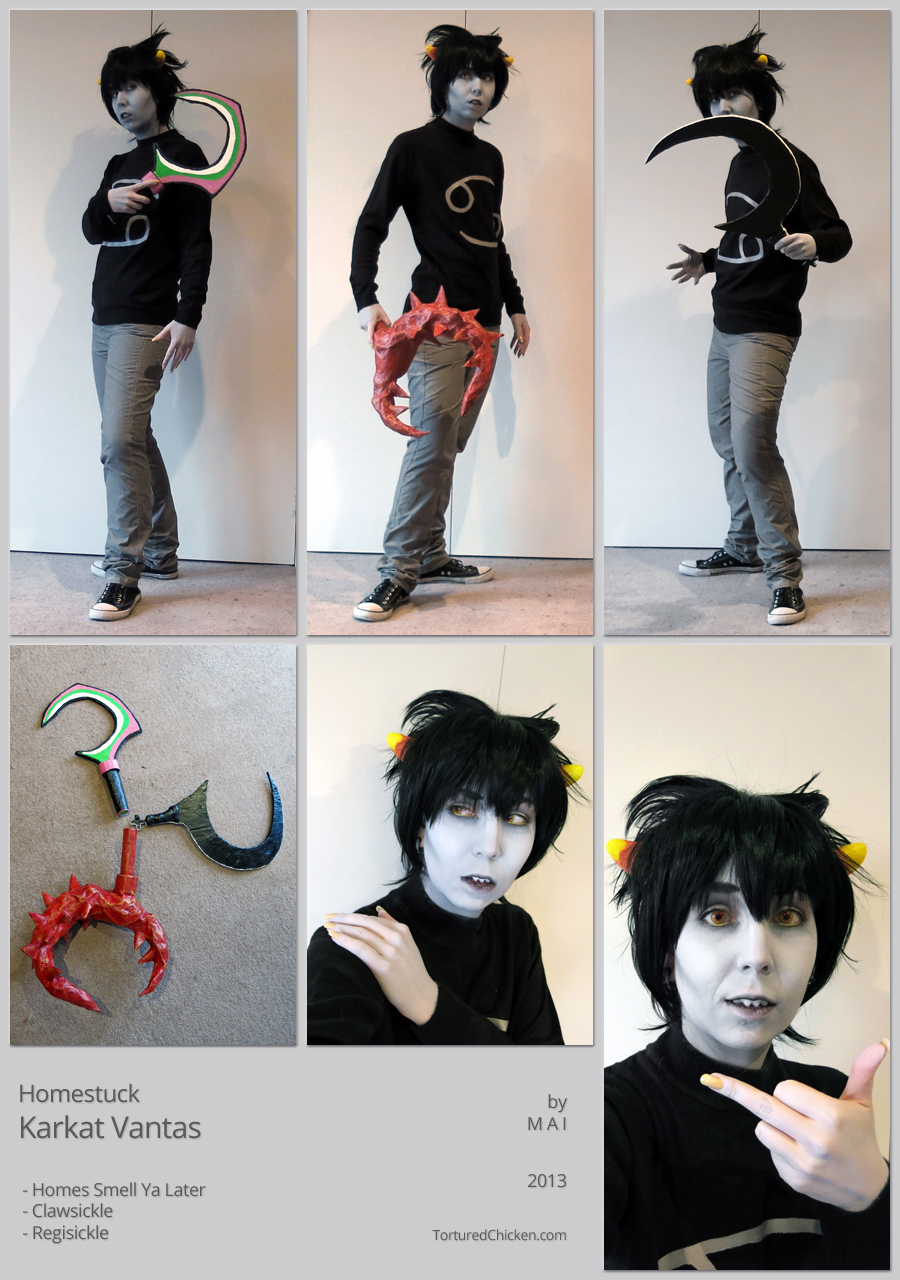
Karkat Vantas | Homestuck
One of the Homestuck trolls; Karkat. Considering how simple he was, he took far longer than entirely necessary. His clothing was all purchased second-hand and the symbol on the sweater was painted on with silver acrylic paints, mixed with a small amount of red to take the edge off the shiny.
Sickles are made mostly of newspaper, PVA, cardboard, hot glue and foam.
- Homes Smell Ya Later is entirely cardboard, newspaper, PVA and hot glue.
- Clawsickle has a cardboard handle, but the actual claw is scrunched up newspaper, wrapped in masking tape, with spikes of foam and hot glue. Covered in newspaper and PVA.
- Regisickle has a cardboard blade, covered in newspaper and PVA, with a plastimake handle.
- Once all the glue was dry Homes’ and Regisickle were sprayed with a few coats of matte black enamel paint, then details painted on with acrylics and finished with a matte sealant; while Clawsickle was painted entirely with acrylics- a base in dark red/burgundy, bright red sponged over, yellow highlights sponged over that and again, finished with the matte sealant spray.
The horns and teeth are made of polycaprolactone; a type of plastic with a low melting point. The brand is Plastimake, who sell jars of the plastic pellets and colour pellets to mix into the plastic (which is ordinarily white).
The horns used about two tablespoons of plastic each, with red and yellow colour pellets. For each tbsp of plastic 5 colour pellets were added in either red or yellow (so: 2tbsp with 10 red pellets and 2tbsp with 10 yellow pellets).
The red and yellow lumps were then split in half and combined to make the horns- red at the base, yellow at the tip and the middle portion blended to create orange.
Initially to attach the horns I’d melted holes in the base to thread an elastic strap through:
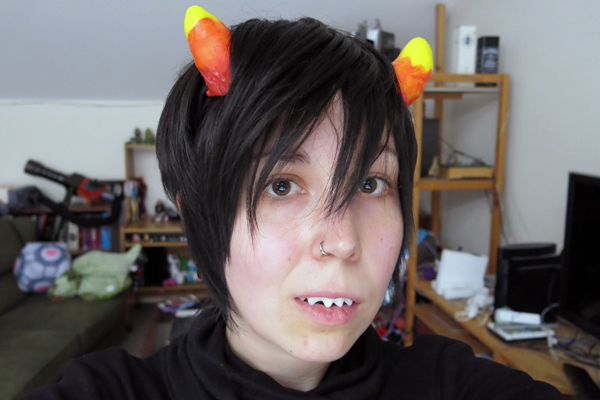
Karkat’s teeth and horns: round 1.
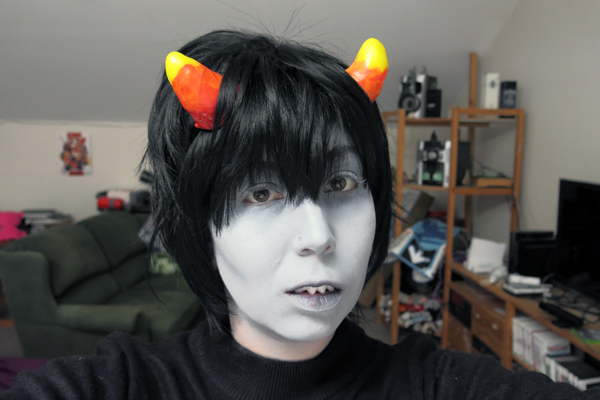
Karkat’s teeth and horns: round 2 ft. makeup test.
But wasn’t 100% happy with the way they sat, nor the visibility of the elastic through the hair. So I removed it, remelted them slightly to smooth over the holes, and affixed small pieces of metal to the base instead.
Why pieces of metal?
The horns are not terribly heavy and I had some strong magnets laying around. So instead of wearing them on a headband; the magnets slip up under the wig to hold the horns in place.
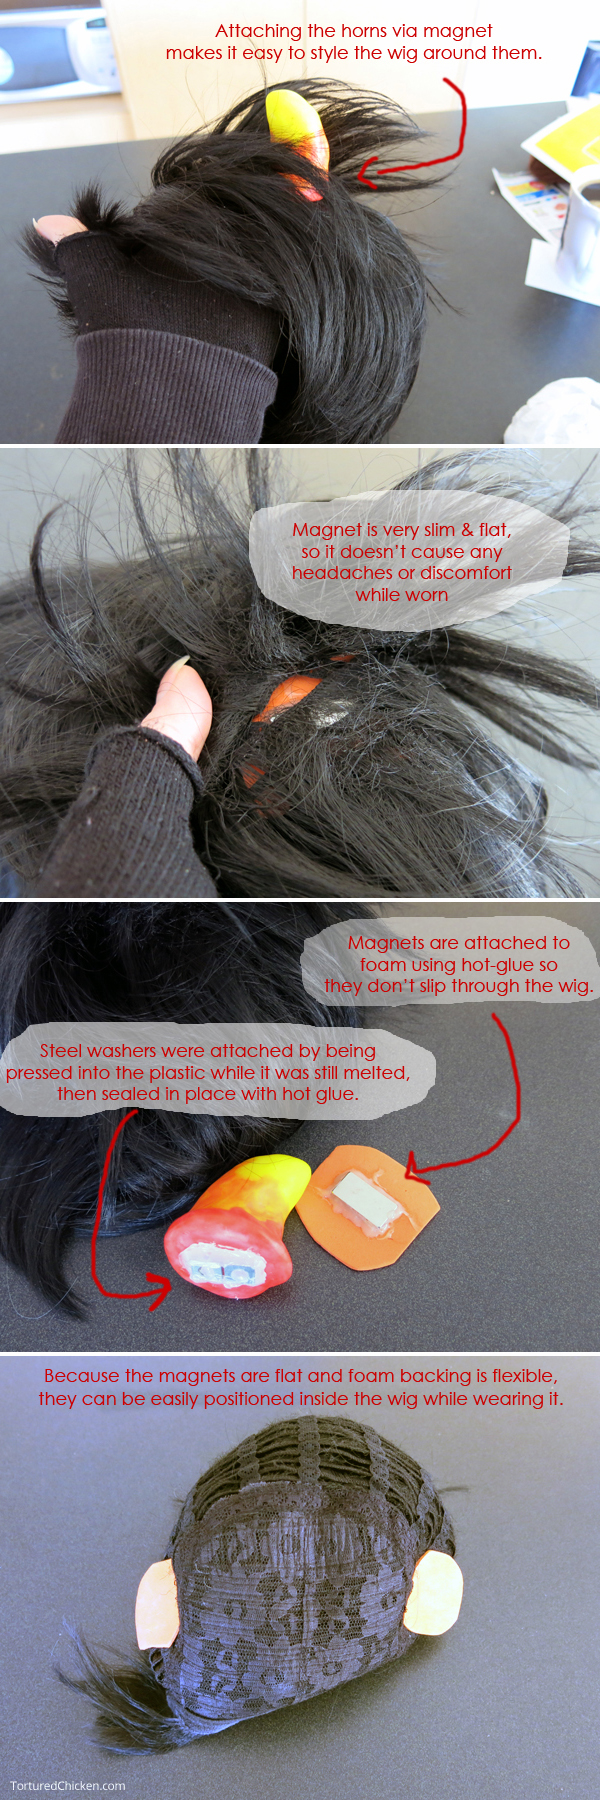
Horns attached to wig via magnets.
I’m not sure how this would go for bigger horns (say Gamzee or Tavros) but have heard of people having some success making hollow horns from Plastimake, which would be much lighter than doing them solid like I did (and if you wonder about the colour pellets, they are not a necessity as it is perfectly fine to paint polycaprolactone after it has cooled).
Now, the teeth… they were… so much less straightforward in reality than they were in my mind.
They weren’t really difficult as such, just very fiddly, and were my first time making teeth ever so, y’know, there’s that. They used… probably no more than a half tablespoon plastic total (a little goes a long way) but I couldn’t really say how much per tooth? A tooth’s worth… uh… yeah…
So I got 6 little balls of plastic which added together were approximately maybe a bit less than a 1/2 tbsp, shaped them into little pointy teeth and squished them over my actual existing teeth. That was the difficult part. Work too quickly? Squish and mangle the teeth out of shape. Work too slowly? The plastic cools too much for the teeth to stick together properly. It took a few shots but eventually they came together in a way that made me happy.
Two of the best aspects of polycaprolactone: completely safe to shove in your mouth (as long as you’re not literally eating too much of it, I mean) and you can keep remelting/reshaping it as much as you like. Which means that, once I got my head around what exactly it was that I was doing, the teeth could mould perfectly over my existing teeth- in fact they sit across the front only, without hooking over the back at all, so I can actually speak coherently while wearing them (well… enunciate clearly, I still have no idea about sentence structure or stringing words together).
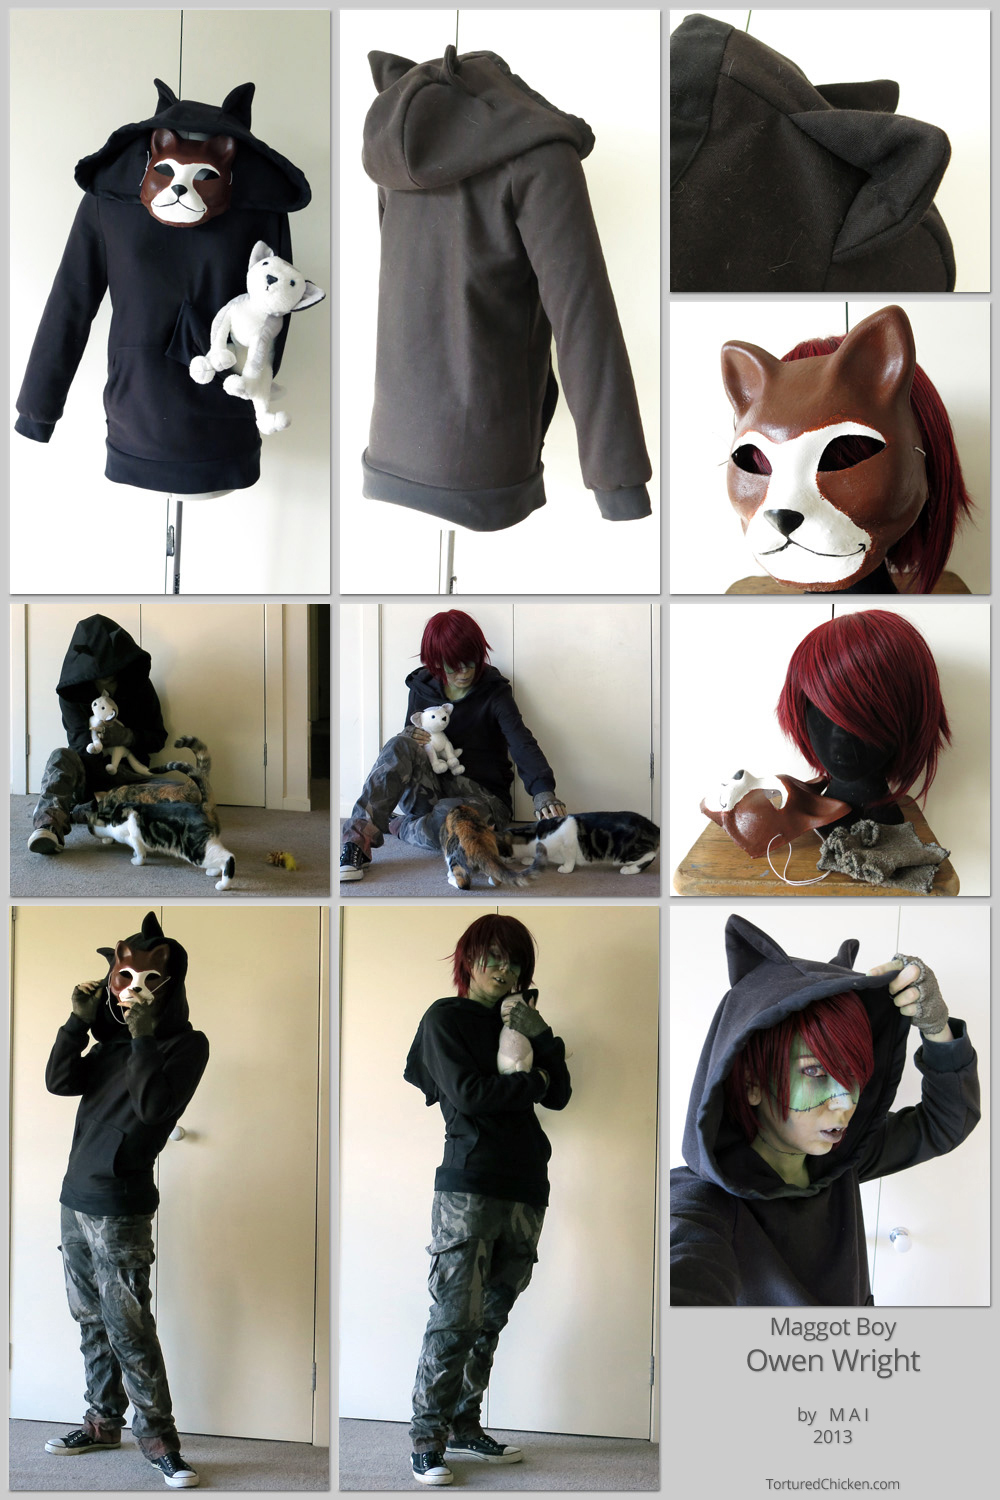
A similar teeth-method was used for my Owen Wright (from Maggot Boy) costume, upon realising that my own home-grown overbite is neither exaggerated nor crooked enough for the character:
Though his took a lot more work than Karkat’s.
Owen has a big gap in his front teeth, which I believe is a chip or a crack. Initially I tried to build his teeth over my existing teeth (same as with Karkat) but they came out much too big and, if I opened my mouth too wide, were much too obviously “fake” looking. If I made them smaller the gap couldn’t be big enough without my real teeth showing through in between.
The dilemma was solved by mixing a black colour pellet into a very small amount of plastic and smoothing that over my teeth; then affixing the crooked/broken teeth over that. The black hid my teeth so Owen’s teeth could be much smaller, thus allowing me to do a range of creepy smiles without giving away the fakeness of the teeth quite so much.
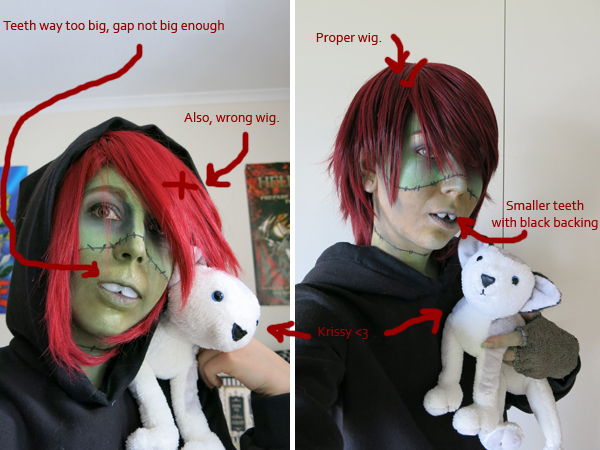
Owen construction progress.
Never underestimate the importance of creepy smiles to cosplay.
For anybody who is curious:
Karkat’s wig is LuCaille brand and cost around $30. The front was quite long so I trimmed it back a ways.
Owen’s wig was an eBay find for about $25 and, again, was quite long. Much was taken off the right hand side and back, while the front was styled to the left, and remains reasonably long (the stand-in wig used for Owen’s early progress shots was another eBay purchase, originally used for my Rory Dubois costumes. The colour was too bright for Owen- and I love Rory too much to re-style it anyway).
Makeup for both Owen and Karkat was Snazaroo Classic Colours face paint, which was purchased at a local Lincraft store, around $11 for an 18ml pot. It’s water-based, so comes off easily. It is applied with a damp sponge (doesn’t need much water, a little goes a long way) and achieves best coverage by applying several thin layers.
For Karkat the colours used were: light grey, white and black.
For Owen the grey, white, and black were used again, with the addition of green and brown. The grey takes the edge off the green and brown while the white and black are used for highlighting and contouring respectively.
Owen’s sutures were painted on with liquid eyelier. Powder eye shadow and gel eyeliners were used around the eyes for both characters.
Owen’s contact lenses are a grey mesh style and I can see sweet fuck all while wearing them. Karkats are yellow with red detailing around the pupil. I went with the red/yellow combo rather than plain yellow since it’s established that the trolls eyes fill in with their blood colour as they mature, and Karkat’s blood is red. I considered getting full sclera lenses, but they were quite expensive so instead I opted for yellow eyeliners to give a jaundiced illusion; yellow gel eyeliner by Medusa’s Make-Up in NYC Cab and liquid eyeliner by Lime Crime in Citreuse.
Finished with black mascara, it helps a lot to define the eyes.
You know what felt good? Blogging about costumes. Finally getting back into the swing of things after the big move!

